So, last road map discussion it was decided I would start working on HDR. This is partially because I have the hardware for it, as well as Krita now supporting the wayland color management protocol, so my hardware is actually being used appropriately.
Furthermore, before I worked on text my specialization within Krita is its color management code, so I feel a little like a fish in water right now.
HDR tends to mean three separate things:
There’s the hardware side, where a screen can show such bright colors that it needs to be interacted with in a special way to make good use of those colors. This particular manner also informs how we store HDR values inside file formats.
There’s the scene referred workflow, where we assume there’s a scene white, usually the brightness of a diffuse white, like paper, and highlights are above that are the high dynamic range.
Finally, there’s the tone mapped result of a scene referred image. That means that we take the scene referred image, and scale everything so that the result fits into a regular SDR range. This is typically the version that people learn of first when they scroll photography websites.
For Krita’s purpose, we’re largely interested in the first two. The hardware and file format side in particular needs a lot of work to get all the metadata right. For the scene referred section, the filters need adaptation. But the last entry is necessary to create a nice result image for social media, so I’ll cover that in the future too.
When I started work on the text tool, I had planned it in three phases.
The first phase was going to be the on canvas editor. And I handled inserting and removing text, moving the cursor around, and creating simple wrapping areas. IME support and simple copy-paste was also handled during this phase.
The second phase was about rich text editing. I created a text properties docker, implemented a font database, style presets, a glyph palette and went over each property individually to make 100% sure it worked. I wrote a bunch of blogposts about this in the past (text layout, fonts, OpenType, metrics, and more).
So, after the font family, opentype handling and font metrics rework, there’s some text properties left that aren’t particularly related to one another. Furthermore, at time of writing I also have tackled better UI elements, as well as style presets, so I’ll talk a bit about those too.
Language
The first few properties are all affected by the language set on the text shape. So the first thing I tackled was a language selector.
The format accepted by SVG is an xml:lang, which takes a BCP47 language code. This is unlike QLocale, which uses a POSIX style string of lang_territory_script@modifier, where it ignores the modifier.
While you’d think that’d be good enough, that modifier is actually kinda important. For example, when parsing PSD files, the BCP47 code associated with the extremely American term “Old German” is de-1901, “German according to the 1901 orthography”.
So the first thing I ended up doing is creating a little BCP47 parser, that can utilize QLocale for the proper name, without losing the variants and extensions and what have you.
For the UI widget, it is at its most basic a combobox. Instead of showing all possible BCP47 codes (which’d be too much), we instead only show previously used languages in this session and “favourited” languages, with the latter defaulting to the current languages of the application. Users can type full BCP47 language codes into the combobox and have it parsed.
By default the language dropdown shows the current list of localesArtists will be able to type in any valid BCP47 code, and Krita will try its best to parse and display it.
However, it’s likely someone may not know the BCP47 code for a given language, and while they could find that on, say, Wikipedia, that still is a considerable amount of friction. So instead we use QLocale to populate a model with the basic names and territory codes. This model then is set onto a ProxySortFilterModel, which in turn is used as a sort of completer model. This allows users to type in partial names, and it’ll show an overlay with matches.
Artists will be able to type in a language and Krita will provide a search.Languages that have been used this session will be added to the dropdown, where they can be made persistent.
There’s a bit of a problem here though: QLocale can only provide the native name and the English name of a locale, but not, say, the Mandarin chinese name of French. I don’t know if we can ever fix this, as I don’t particularly feel like making translators translate every single language name.
Either way, this should allow someone who uses their computer in English, but speaks French to type in fr and then go into the dropdown to mark that as a favourite so it is easily accessible in all future text shapes.
Most programs use text language to provide spellcheck or hyphenation. Krita does neither right now, but that doesn’t mean it doesn’t use language. For one, some OpenType fonts have a locl feature that gets toggled when you provide the shaper with the appropriate language. There’s two other places we use the language as well:
Line Break and Word Break
Line break and word break both modify the soft wrapping in a piece of text.
Line break in particular can be modified to allow line breaks before or after certain punctuation, with a loose line breaking breaking at all possible places, and a strict line breaking not allowing breaks before and after certain punctuation marks. Which marks those are depends on the content language, and CSS defines several rules for Chinese and Japanese content.
LibUnibreak, which we’re using, doesn’t have loose rules for any languages, but it does allow for strict. A project like KoReader is able to customize the result of LibUnibreak to support more languages, and that might be a future solution. However, it might also be that we look for a different line breaking library as LibUnibreak is going to be limited to Unicode 15.0: Unicode 15.01 introduced improvements for Brahmic scripts, and because those scripts are quite complex, it won’t work with LibUnibreak’s architecture.
The Krita slogan in Korean. Left has word-break: normal, right word-break: keep all, which means soft breaks happen only at the spaces.
Word break is somewhat similar to line break. Some scripts, in particular Korean and Ethiopian, have two major ways of line breaking: word-based and grapheme-based, and depending on the context, you may need one or the other. Word break provides a toggle for that choice.
Text Transform
Text transform is also affected by language. I didn’t really need to do much here however, just forgot to have it inherit properly. I don’t recall if I did touch upon that before, but another annoying thing with text-transform, given it can change the amount of codepoints in a sentence, is that you will need to take care to keep track of those changes, and ideally I’d rework the code so this happens at the last possible moment.
Spacing
Then there’s a number of spacing/white space related features. Letter and word spacing were not touched in these last few weeks, though they do have some peculiarities, and I will discuss them when talking about phase 3 features, when the time comes.
White Space
The CSS white-space rule is my enemy. It exists to facilitate hand-written XML files, and in those, you might want to manually line break text, and have the computer automatically unbreak said text and remove unnecessary white space. And that is also the default behaviour.
In the context of a what-you-see-is-what-you-get text editor however, this default behaviour mostly gives us a text interaction where spaces are getting eaten for no particular reason. Not just that, but this painful default behaviour is called “normal”. Which means that, if we set white space to the much more preferrable “pre-wrap”, users will see a toggle they don’t know. And if they set the toggle to what they would consider the default behaviour, “normal”, they get distinctly not “normal” behaviour.
This’ll probably be fixed by CSS-Text-4, where white-space has been split into white-space-collapse and text-wrap, with the former having much more descriptive “collapse” and “preserve” modes. Until we handle that properly though, the white-space property is going to be hidden by default so we don’t have to troubleshoot that endlessly.
Beyond that, the thing that got fixed code-wise is that white space can now be applied per range. To do this, you need to get the whole string inside the paragraph, and then process each range separately, as white spaces present in a previous range can affect whether collapses happen in the current.
Tab size and Indentation
So, the way tabs work is that instead of just adding spacing, it adds spacing so the next grapheme starts at a multiple of the tab-size. This required some rework, in particular with line-breaking and especially with wrapping text in a shape, but I’ve managed to get that to work.
Showcasing the tab-size property. This is probably not going to be the most used property, but it is good to have functional
Text indentation is similar, though I don’t quite understand how it should work for text-in-shape. Like, should the identation be equal for every new line (current behaviour) or instead be similar to tab-size, and snap to a multiple?
Showcasing text-indent. Both paragraphs have text-indent set to 1 em, but the left one only sets text-indent per new line, while the right one uses hanging indentation.
Text Align and Text Anchoring
Text align didn’t need any changes code wise. It did however need some fixing UI wise. You see, for text-in-shape, SVG 2 uses text-align, while for all other text types, including inline-size wrapping, it uses text-anchor.
This is because SVG was originally a lot dumber in regards to how text works, and the most important thing it needed to know is where the start (anchor) of a given chunk of text is. Inline-size, meanwhile, is basically the simplest form of wrapping bolted onto SVG 1.1 text, and thus uses text-anchor. This does mean that this simple wrapping doesn’t have access to full justification of text, as that’s only in text-align.
On the flip side, text-align and text-align-last only apply to text-in-shape and come from CSS-text. There’s many different options there, and some of them also change behaviour depending on the text-direction. Text-align-last even only really applies when the text is full justified.
The UI for text-anchor and text-align. The top 4 buttons is what most people will see, while clicking on the arrow will fold out the precise options.
These are all tiny implementation details that I didn’t want to bore people with, so I tried to simplify it to three buttons (start/middle/end) and a toggle for justification. People can still set each property separately, but most people won’t ever have to touch this.
SVG 2 only allows justification when the text is in a shape, but it is otherwise functional.
Text Rendering
Within text layout, there is this concept of “hinting”, that is, hints as how to properly rasterize the vector glyphs onto a limited amount of pixels. A full vector program like Inkscape doesn’t really have any use for this, but within Krita text is rasterized before compositing.
Now, SVG has the text-rendering property which allows us to decide what kind of rendering we have. For krita, we use “optimizeSpeed” to mean no antialiasing and full hinting, great for pixel art fonts, while “optimizeLegibility” only does full-hinting for vertical text, and light hinting for regular. Then there’s “geometricPrecision” which uses no hinting whatsoever.
If your system does upscaling, it may not be visible, but each of the above texts are rendered with pixel art fonts, and optimize speed enabled, as well, in some cases letterspacing and baseline shift has been enabled. The text layout will snap such offsets to the nearest pixel so text remains crisp.
Besides toggling hinting and antialiasing, these options also get used to ensure the offsets, like line height, baseline shift, tab-size, text-indent dominant baseline and text-decoration get adjusted to the nearest pixel. This should make it easier to have nice pixel perfect lettering, which is something artists have expressed a need for.
QML items and Docker rework
One of the things that was important to me when designing the text properties docker was to ensure folks wouldn’t get overwhelmed. Due this, I spend a lot of time trying to make sure only relevant properties are seen. CSS’ structure is designed to facilitate this, as it allows for partial stylesheets and you don’t need to provide a definition for each style, so I decided to have that reflect inside the docker. Furthermore, when adding new properties I made sure that the search is able to search for alternate key terms, so that a state-of-art term like “tracking” brings up the property “letter-spacing”. The docker is also set up to make it easy to revert properties, so that people can experiment with new properties and if they don’t like them, revert them with a single click.
One of the original mockups for the text properties docker. Design 1 was one that tried to hide all properties under fold-outs. Removing of inherited properties was also in this design.In design 2 I focused on making the UI less busy and more experimentation friendly. This is the one we went with at the end for that precise reason.
Some people in the text tool thread weren’t too happy with this; things that appear and disappear are generally considered scary UI. But to me this isn’t much different from layers inside a layer stack. Furthermore, disappearing UI elements generally are the most annoying on systems where this is not an internal representation inside the data, as that means there’s a good chance the UI and the data get out of sync. Because CSS does have partial sheets, figuring out which controls are currently relevant is trivial.
The final docker like how its shown in Krita. Biggest changes is that properties which have a main widget (like font substyle selection) can be expanded to show the precise options. Similarly, the button at the start will show a multi-headed icon when selecting a range of text with multiple different values.
Revert buttons also had many critics, because other text applications don’t have this, and it’s extra buttons, and extra buttons is bad UI. This is a bit of a UI myth, as a good UI is one that allows you to stay in control of the data object you’re manipulating. Sometimes, this can mean that there’s less buttons, but with the complexity of CSS, I felt it was important you would always know whether a property was currently being applied or inherited. Similarly, the fact you can quickly revert a property should facilitate experimentation. And it is not like there’s no one out there that hasn’t gone insane with frustration trying to figure out which text properties are being set, and how to unset them. In many applications, this leads to liberal use of “remove all formatting”, which shouldn’t be as necessary with this docker.
Still, some good points were made: Some basic properties always need to show, like font-size and font-family, as to avoid confusion. Similarly, we always want to hide some properties, like our footgun friend white-space. Finally, some folks just always want to see all properties.
Some people want to always see all properties at all times. A part of me still wonders if they fully understand how many properties Krita supports, but regardless, it is possible. Note that the search bar becomes a filter in this situation.
For this reason, I made it so that all properties can be set “always shown”, “when relevant”, “when set”, “never shown” and “follow default” (The difference between “when relevant” and “when set” is that the former also shows when CSS inheritance is happening. Follow default allows for quickly switching all properties) When there’s no properties that are situationally visible, the search to add a property is replaced with a filter search. This way, we should be able to have a default behaviour suited for progressive disclosure, while people who hate disappearing widgets can disable those. And, as a final plus, I won’t have to deal with people complaining about toggles they don’t use in their language and how I should remove this unnecessary feature.
Both when showing all, or only showing relevant, the search at the bottom can find results for different keywords. In this case, letter-spacing, word-spacing and font-kerning all have “tracking” defined as a possible keyword, and thus the rest are filtered away. This should help people with typography backgrounds find properties even without knowing css all that well.
This was all facilitated by the docker using QML. We’ve previously had attempts at QML integration in Krita, but that was always either a separate UI (krita sketch) that easily broke, or a somewhat unmaintained docker like the touch docker. This time however, we’re committed to actually getting this to work properly, and I have also started using QML for the glyph palette.
One annoying thing with using QML, and even with using the QtQuick.Controls is that we didn’t have access to our QWidget controls anymore, meaning we didn’t have sliders. Thankfully another contributor, Deif Lou, was so kind to hack a port of those sliders together, and I was able to import those into Krita to use in the text properties docker.
Style Presets
With a docker that only shows relevant properties, and can show somewhere between 30-50 of them, the need for presets became self-evident. CSS has support for style classes build in, being its primary usecase even. Krita doesn’t have support for style classes themselves (it can only parse them), but that doesn’t mean we cannot provide presets.
For the presets, I decided to use a small SVG file with a single text object as the storage method. We identify the element that contains the stored style by adding a krita:style-type attribute to that element:
<?xml version="1.0" encoding="UTF-8"?>
<svg xmlns="http://www.w3.org/2000/svg" height="14pt" width="40pt" viewbox="0 0 40 14" xmlns:krita="http://krita.org/namespaces/svg/krita">
    <text transform="translate(0, 12)" font-size="12"><title>Superscript</title><desc>This halves the font-size and offsets the text towards the top.</desc>Super<tspan krita:style-type="character" style="baseline-shift:super; font-size: 0.5em;">script</tspan></text>
</svg>
The reason for a text object instead of using a plain CSS class, is that this allows us to provide a good demonstrative sample. If you create a style like a synthetic superscript, you will want to show that superscript in the context of the text it will be situated in, because otherwise it is invisible.
The style preset selector. Not mentioned is the significant amount of time that was spend making the style and font previews look good. I do think it’s time well-spend as I think the nice big preview make it very inviting to use.
There’s also the possibility to create a “pixel-relative” style. File wise, this means that krita:style-resolution="72dpi" gets added as an attribute. In practice, this is because CSS itself has a hardcoded relationship between points:pixels:inches of 96:72:1, which can be worked with if you’re working in a vector-only environment, but not in a raster one. For this reason, Krita only really stores points and font-relative units. A pixel-relative style then gets scaled depending on the document resolution, so that users can create styles for 12 pixel high text (again, this is because of the pixel-perfect font requirement).
There’s more work that needs to be done here. For example, right now, we cannot edit the fill/stroke, so we’re just not storing that. We also have a very harsh split between paragraph (block level) and character (inline-level) properties, and it would be more ergonomic if we could remove that.
Next Steps
Phase 2 is nearly done. Before finishing this, I’d like to rework the properties a bit more because I got a bit better at QML, and I think I can handle some things more elegantly now. I also want to see if I can get rid of the harsh paragraph/character properties distinction.
After that, phase 3 will start. I have already started on it with some converters so old Krita 5.1 texts can be converted to wrapped text. I also want to replace the text tool options so new texts can be made on basis of a style preset or whatever is in the docker now. I want to remove the old rich text editor. And I want to work on a svg character transforms editing mode, called typesetting mode.
Finally, there’s still the issue of the text paths, that is “text-on-path” and “text-in-shape” That one is being blocked by the sheer complexity of editing the paths themselves (The text-layout parts work fine). We’ve recently done a bunch of meetings to figure out the proper solution here, so I’ll be working on that soon as well.
Appendix
Old German
The reason I find “Old German” very American is because terms like “Old German”, “Old English” and “Old Dutch” all refer to languages that predate the establishment of the United States of America. So, only someone from that country would think that these are appropriate names for what’s basically an older standard spelling variant.
Adobe uses them largely to pick the older style hyphenation dictionaries, which is important for backwards compatibility, but I can’t really understand why “German 1901” was not considered instead of “Old German”.
As an aside, despite having a special “Old Dutch” category inside Adobe products, there isn’t a special BCP47 variant for it. I honestly don’t know which version of Dutch they mean by “Old Dutch”, because in my lifetime, spelling rules have changed significantly, twice, and the latter was so disliked that there’s a second version of it used by certain newspapers. Similarly, you will also not find “nl-1996” or “nl-white-booklet” in BCP47, meaning that even if I did figure it out, we still wouldn’t be able to assign a meaningful BCP47 code to it.
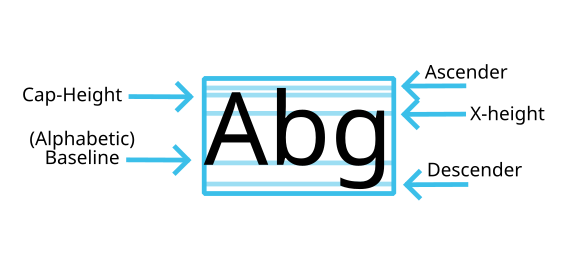
After tackling fonts and opentype features thoroughly, I decided to continue on with taking care of font metrics. This covered font size, line height, baseline alignment and shift, as well as text underlines and carets.
Over the past few years, I’ve done a few things in regards to comics. One of them is creating a comic manager for Krita, another is doing work on Peruse. But one thing that’s also changed for me is the comic template I was using.
Originally, I used an A4 based comic template, with margins of 15 mm at the top and bottom, and margins of 10 mm at the left and right, and an overal bleed of 5 mm. I had been doing so as a teen, as this is relatively normal for European comics culture. But recently, I’ve been shifting towards A6 size comics.
The text "OpenType Features" in a curly font named "Monte Carlo". It is shown twice, with the lower copy having OpenType features enabled, meaning that some select letters look extra decorative.
So, after my last blog post, I ended up taking another few months to get the fonts branch just right, but now we have font resource that can be tagged, filtered and searched upon.
After that, I needed my next text editing project to be a bit more manageable. Given that I had already made some head start on it at the beginning of last year, I continued with UI for the OpenType features.
The top level of these shows the Weight, Width and Slant selection in CSS, while the bottom level shows the effect optical scaling has.
It’s been a while since my last blog post regarding text. Since then I’ve been working on the on-canvas text tool, as well as multiple reworks for rich text editing, the actual text properties docker for this rich text editing, and finally I’ve done a talk at the Libre Graphics Meeting about my work on the text tool.
I’m now at the point that I’m going over each property and thoroughly polish it. Because I’m also doing frequent updates on the krita-artists forum, I’m hoping to punctuate each polish session with an introduction to the property, and because I also have a lot of technical things to talk about, I’ll be making technical blog posts alongside that, of which this will be the first.
So the first thing that needed to be tackled after putting together the basic text properties docker and the related interaction is font selection. Krita’s text tool is based on SVG+CSS, and uses FontConfig to select fonts. Typically, a font selection widget will show the list fonts, and in some cases, it organises this in two dropdowns, where the first is the font family, and the second a sub family, like italic or bold. So obviously there’s meta data for this, right, and you should just plug that in the right places, and everything’s peachy? Well, we do have a lot of meta data…
My text-layout testing sheet filled with all sorts of random test samples.
The past few months I’ve been rewriting the text layout engine used by Krita’s text tool. This is not the same as the text tool itself, which is still a super small rich text editor, but it is a prerequisite to getting any kind of new features into the text shape. We haven’t done any real improvements to text since the work for the last fundraiser we had for it, and that is because this needed to be done, it is a lot of work, an we had vowed to take care of resource management first, which, uh, took us so long and was so intensive that it covered the whole development cycle from 4.0 to 5.0, or a span of 5~ years. I’m not the only developer who can finally tackle a sore point, there’s work being done on audio, lots of file format updates, work on assistants, technology upgrades and more… But this blog is about text.
I’ve been slowly building up an OPDS feed, because I added support to KNewStuff, and I wanted to make sure I was able to make an OPDS feed myself.
Of course, the biggest problem is content. I have some fan comics lying around, and I have some Krita Resource Bundles that are all over the place… But there was a thing missing. Back when I was fifteen, I started work on a comic named Streets of Ganjet, an urban fantasy comic about the people living in the city of Ganjet. I have tried to rewrite it, but never got far enough for it to publish new chapters.